Un article précédent nous décrivait comment ajouter la météo depuis le service Forecast.io, voyons ici comment configurer Domoticz pour afficher la météo récupérée depuis le service Weather Underground.
Certains développements d’interfaces utilisant ce service météo plutôt que Forecast.io m’ont donné envie d’en présenter la mise en place.
Librement traduit depuis le wiki anglophone dont voici la source http://www.domoticz.com/wiki/Virtual_weather_devices
1 – Obtention d’une clé API
- Cliquez sur le bouton orange marqué « Sign Up for FREE! »
- Remplissez les champs e-mail/mot de passe, puis le « Handle » qui est votre surnom 🙄 sous « Create Your Free Account! », acceptez les conditions puis cliquez « Sign Up »
- Vous recevez un e-mail d’activation contenant une URL, cliqez pour activer le compte.
- Vous pouvez vous connecter sur le site.
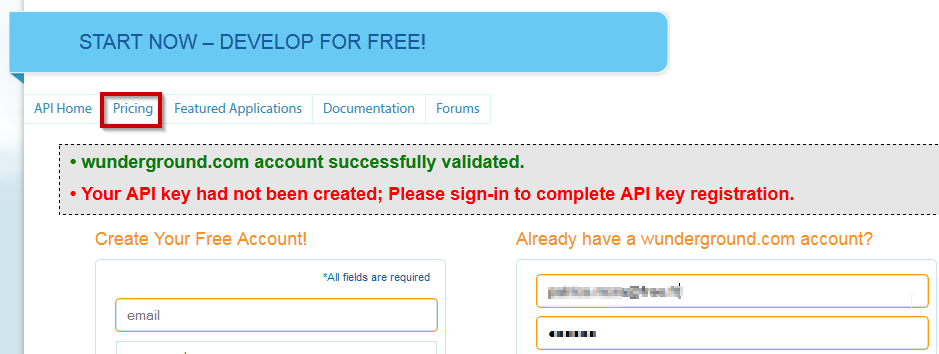
- Allez à la page « Pricing » page: http://www.wunderground.com/weather/api/d/pricing.html
- Choisissez les options suivantes :
-
 * ANVIL PLAN
   * Yes, give me access to the daily weather archives
   * Developer

Je tiens à faire remarquer que nous serons limités à 500 appels par jour ET 10 par minute, donc pas d’interrogations intempestives.
- On clique sur « Purchase Key » en bleu.
- On emplit le formulaire
   * Contact name: (votre nom)
   * Project contact e-mail: (votre adresse mail)
   * Project name: Domoticz
   * Project website: http://www.domoticz.com
   * Where will the API be used: Website
   * Will the API be used for commercial use: No
   * Will the API be used for manufacturing mobile chip processing: No
   * Votre Pays
   * A brief description: "J'aime avoir la méteo dans Domoticz (ou autre chose comme cela;) )
- Cochez les deux cases en dessous
- Cliquez « Purchase Key »
- Nous avons notre clé API.
- Ne fermez pas la page, nous avons des copier/coller à faire plus tard.
2 – Localisons une station météo à proximité.
- Allez à http://www.wunderground.com/wundermap
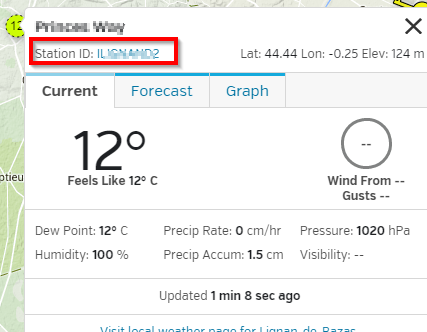
- Trouvez sur la carte une station à proximité de chez vous
- Cliquez sur la station représente par un marquer avec la température dedans
Dans la fenêtre qui s’ouvre, copiez le « Station ID »
3 – Domoticz
Configurons Domoticz.
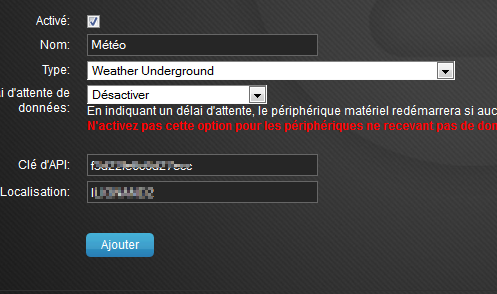
- Allez dans « Configuration puis « Matériel »
- Dans la partie du bas , déroulez tout en bas pour trouver « Weather Underground »
- Ne forcez pas la récupération par le champ « Délai d’attente de données » toutes les minutes car c’est inutile d’avoir la météo minute par minute.Domoticz interroge le site toutes les 10 minutes automatiquement. Souvenez vous que la version gratuite de Weather Underground ne nous offre que 10 appels par minutes et 500/jour.
- Activez le composant, nommez le, puis récupérer la clé API par des copier/coller dans le champ du bas.
- Le champ « Localisation » DOIT COMMENCER par pws: puis votre Station ID relevé plus haut. Toutefois les mise à jour récentes semblent ne plus avoir besoin du pws: 😯
IL FAUT METTRE pws: ou pas !!
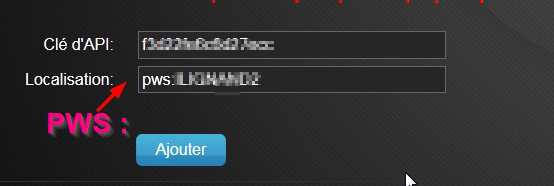
- Cliquez sur « Ajouter »
- Allez voir les logs Domoticz, cette étape n’est pas facultative, faites le !!
si vous avez ça :
15-03-01 22:49:53.690 (Compteur EDF) P1 Smart Meter (EDF)
2015-03-01 22:50:00.683 Hardware Monitor: Fetching data (System sensors)
2015-03-01 22:50:01.260 Error: WUnderground: Invalid data received, or unknown location!
C’est pas bon,
si vous avez mis pws: , supprimez le et ne laissez que le nom de la station.
Si vous n’avez pas mis pws: et que cela ne fonctionne pas ajoutez le devant Station ID tout seul. 👿
Dans tous les cas seul les logs vous diront si c’est correct.
4 – Les périphériques.
L’activation réussie de Weather Undergroud , crée 6 dispositifs dans Domoticz.
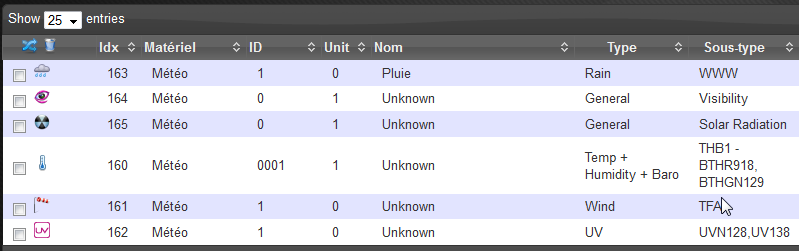
- Rain : Pluie en mm
- Visibility : Visibilité en Km
- Solar Radiation : Radiation solaires
- Temp+Hum+Baro : Température, Humidité, Pression Barométrique
- Wind : Direction, Vitesse du vent, Rafales,
- UV : index UV
Le bouton vert à droite permet, comme à notre habitude, d’ajouter les composants désirés à notre interface web en les nommant.
Voila nous sommes prêts à afficher notre météo dans nos jolies interfaces.
Laissez un commentaire
Super tuto merci sans vous j’en étais incapable.
Est t’il possible de pouvoir récupérer la valeur de la condition météo (nuageux, ensoleillé, etc…) dans une variable via un script pour pouvoir l’utiliser sur des events par la suite ?
Oui bien sur avec le langage de ton choix tu recuperes ta valeur.
Dans Domotice cree une variable texte
Par Json tu la valorise
Et tu peux l’ utiliser partout
OK je vais me lancer la dedans à ce moment là, j’ai trouvé qui est un script pour récupérer la température ça doit pas être loin de ça pour la condition météo. Tu n’aurais pas un lien avec le nom des paramètres à récupérer par hasard ? Ou carrement un morceau de script en lua qui pourrait m’aider !
sur le forum anglophone il y a cette discussion qui corresponds à ce que tu cherche
http://www.domoticz.com/forum/viewtopic.php?f=23&t=6085&sid=cf950d84395da0c14eed05e3867dcfb4
le script Lua est celui ci , (les premieres lignes decodent une meteo et l’assignent a X valeurs)
cela te fait un bon début
Bonne lecture
Pingback: Potager – interface avec une api de météo gratuite, script de probabilité de pluie. – Brico-Info – le blog de Bruno CATTEAU